
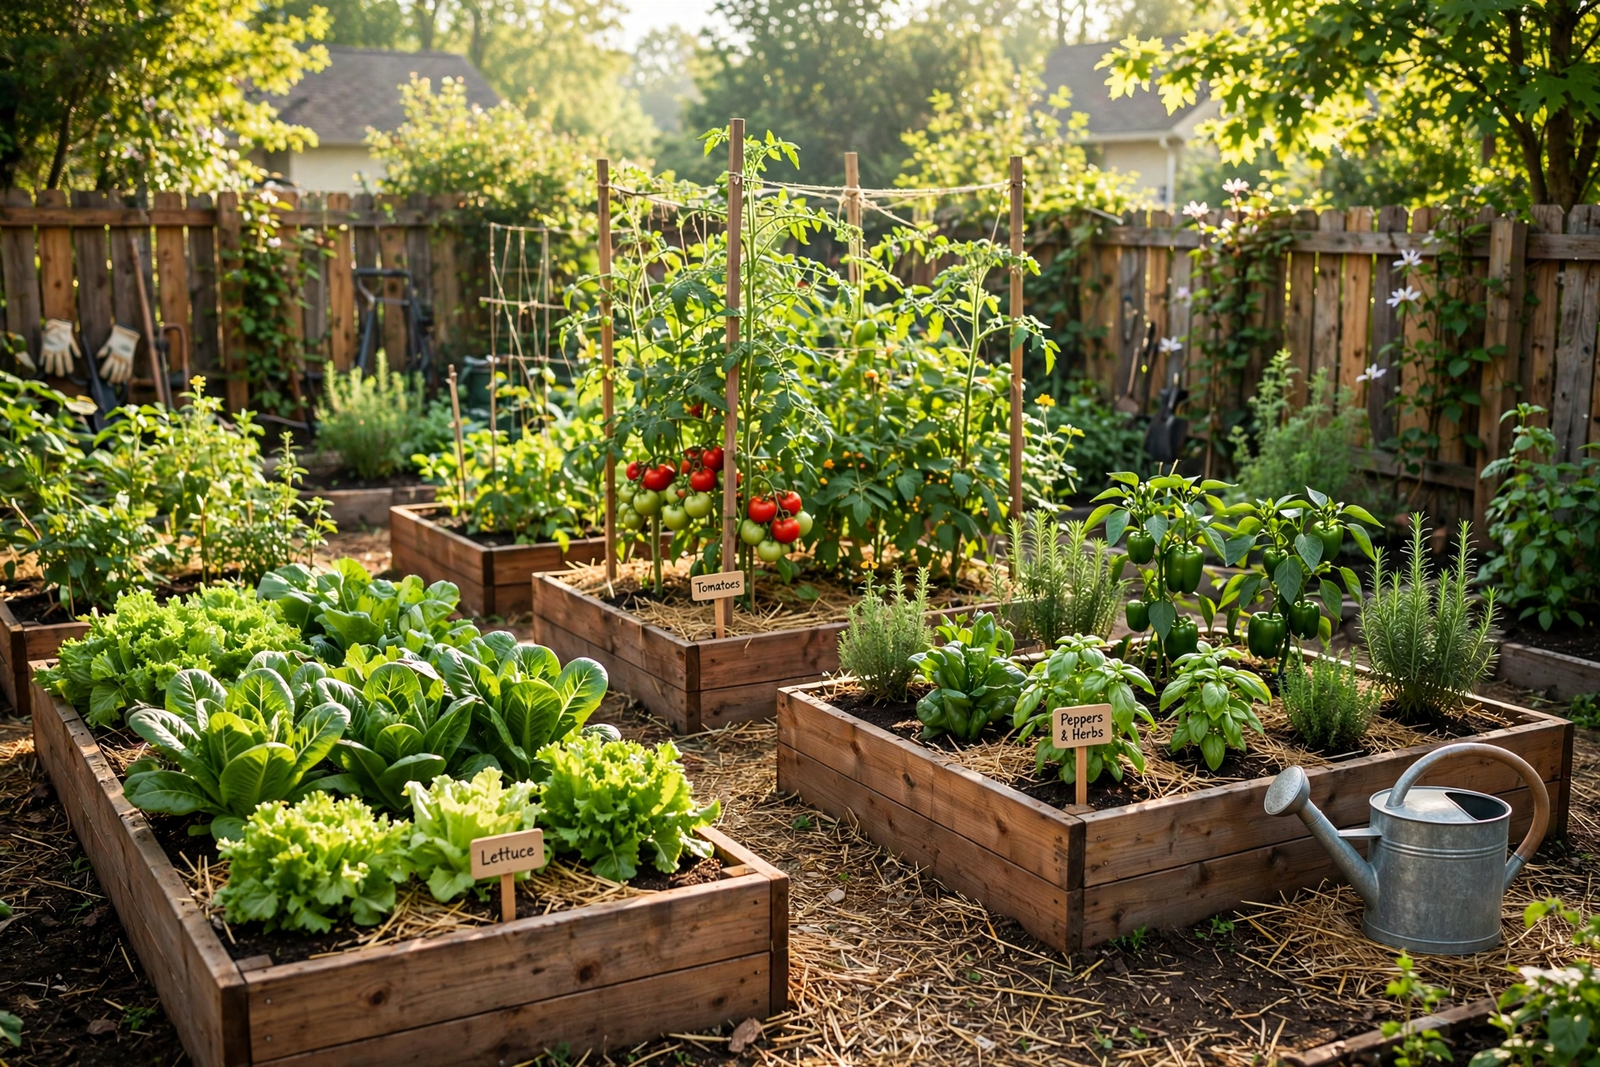
Quick Answer: To start a vegetable garden, pick a spot that gets at least 6 hours of direct sunlight, test and improve your soil with compost, start with easy crops like lettuce, radishes, and tomatoes, plant at the right time for your zone, water deeply but infrequently, and mulch to keep weeds down. Most beginners succeed with a small 4×8-foot raised bed rather than a large in-ground plot.
Growing your own vegetables is one of the most satisfying things you can do at home. Fresh tomatoes that actually taste like tomatoes, crisp lettuce you pick minutes before dinner, herbs that cost pennies instead of dollars — a vegetable garden pays for itself many times over. But if you have never grown anything before, the whole process can feel overwhelming: what do you plant, when do you plant it, and how do you keep it alive?
This guide walks you through the entire process from bare lawn to first harvest, step by step. Follow these steps in order and you will avoid the most common beginner mistakes that kill first-year gardens.
Step 1: Choose the Right Location
Location is the single biggest factor in whether your garden thrives or struggles. Get this right and everything else gets easier.
Sunlight Requirements
Most vegetables need a minimum of 6 hours of direct sunlight per day. Fruiting crops like tomatoes, peppers, cucumbers, and squash want 8 or more hours. Leafy greens like lettuce, spinach, and kale can tolerate partial shade (4-6 hours), so if your yard has a partially shaded spot, reserve it for greens.
Before you commit to a spot, observe it for a day or two. Check how many hours of direct sun it actually gets — morning sun is gentler, afternoon sun is more intense. Avoid spots under large trees, where roots compete for water and nutrients and the canopy blocks light. Also avoid low spots where water pools after rain; soggy soil rots roots.
Water Access and Convenience
Place your garden near a water source. Hauling watering cans across the yard gets old fast, and gardens that are hard to water get watered less. Equally important: put the garden somewhere you will see it every day. A garden tucked behind the garage gets neglected; one you pass on your way to the car gets noticed, watered, and weeded.
Step 2: Decide Between Raised Beds and In-Ground Planting
Beginners do best with raised beds, and here is why:
- Raised beds warm up earlier in spring, drain better, let you control the soil completely, and require less bending and kneeling. A 4×8-foot bed that is 10-12 inches deep is the classic starter size — big enough to be productive, small enough to manage.
- In-ground beds cost less to set up but require digging out sod, dealing with whatever soil you have (which may be heavy clay or sand), and more weeding.
- Containers work if you only have a patio or balcony. Use pots at least 12 inches deep for most vegetables and 5-gallon buckets or larger for tomatoes.
If you build a raised bed, use untreated lumber (cedar or redwood last longest), concrete blocks, or galvanized metal. Avoid old railroad ties or treated wood from before 2004, which may contain arsenic-based preservatives. Fill beds with a mix of roughly 60% topsoil, 30% compost, and 10% aeration material like perlite or coarse vermiculite.
Step 3: Test and Improve Your Soil
Soil is where plants get almost everything they need, and most beginner garden failures trace back to poor soil.
Get a Soil Test
A soil test tells you your soil’s pH and nutrient levels so you are not guessing. Your local cooperative extension office offers inexpensive soil testing — find yours through the University of Minnesota Extension directory or search for your state’s extension service. Most vegetables prefer a pH between 6.0 and 7.0. The test results will tell you exactly what to add (lime to raise pH, sulfur to lower it, specific fertilizers for deficiencies).
Add Organic Matter
Whatever your soil test says, compost helps. Work 2-3 inches of finished compost into the top 6-8 inches of soil before planting. Compost improves drainage in clay soil, helps sandy soil hold water, feeds beneficial microbes, and provides slow-release nutrients. It is the single best thing you can do for any garden.
If you are starting a raised bed with fresh soil mix, you can skip the test for the first season, but still mix in compost and retest in year two.
Step 4: Plan What to Plant
Beginners should start with easy, forgiving crops. Save the fussy ones for year two.
Best Vegetables for Beginners
- Lettuce and salad greens: Fast (ready in 30-45 days), grow in cool weather, and tolerate some shade.
- Radishes: Ready in 25-30 days — the fastest payoff in the garden.
- Green beans: Easy to grow from seed, heavy producers.
- Zucchini and summer squash: Extremely productive; two plants feed a family.
- Tomatoes: Start with transplants (not seeds) from a nursery. Cherry tomatoes are the most forgiving.
- Cucumbers: Fast-growing and productive when given a trellis.
- Peppers: Need warmth but are otherwise easy from transplants.
- Herbs (basil, parsley, chives): Low maintenance and expensive to buy fresh.
Know Your Frost Dates and Zone
Look up your USDA hardiness zone and your average last spring frost date — the Old Farmer’s Almanac frost date calculator is a reliable source. Cool-season crops (lettuce, spinach, radishes, peas, carrots) can go in 2-4 weeks before the last frost. Warm-season crops (tomatoes, peppers, cucumbers, squash, beans) must wait until after the last frost and until soil temperatures are above 60°F.
Plan Your Layout
Sketch your bed on paper before planting. Put tall plants (tomatoes on cages, trellised cucumbers) on the north side so they do not shade shorter plants. Group plants with similar water needs together. Leave walking paths so you can reach everything without stepping on the soil — compacted soil suffocates roots. A common beginner layout for a 4×8 bed: tomatoes along the north edge, peppers and basil in the middle rows, and lettuce and radishes along the south edge.
Do not overcrowd. Check the seed packet for spacing and believe it — cramped plants compete for light and air, get diseased, and produce less. It feels wasteful to leave space between tiny seedlings, but they will fill in.
Step 5: Plant Correctly
You have two options for getting plants in the ground: seeds and transplants.
- Direct sow (plant seeds in the garden): best for beans, peas, corn, carrots, radishes, lettuce, spinach, cucumbers, and squash. These either dislike transplanting or germinate so fast there is no point starting them indoors. Plant at the depth shown on the packet (usually 2-3 times the seed’s diameter) and keep the soil consistently moist until they sprout.
- Transplants (buy seedlings from a nursery): best for tomatoes, peppers, eggplant, and most herbs. Buying transplants gives you a 6-8 week head start and is far easier than starting seeds indoors your first year.
Water thoroughly right after planting — a deep soaking that reaches the root zone. Then mulch: spread 2-3 inches of straw, shredded leaves, or wood chips around plants (keeping mulch a few inches away from stems). Mulch is a beginner’s secret weapon: it suppresses weeds, holds moisture in the soil, keeps soil from splashing onto leaves (which spreads disease), and regulates soil temperature.
Step 6: Water Smart
Vegetables need roughly 1 inch of water per week from rain and irrigation combined, more during heat waves. The right way to water:
- Water deeply and less often rather than a little every day. Deep watering encourages roots to grow down, making plants more drought-tolerant.
- Water the soil, not the leaves. Wet foliage invites fungal diseases. Use a soaker hose or drip irrigation, or water at the base of plants with a watering can.
- Water in the morning. This gives leaves time to dry during the day and reduces disease pressure. Evening watering leaves plants wet overnight.
- Check before you water. Stick your finger 2 inches into the soil. If it feels moist, wait. Overwatering drowns roots just as surely as drought kills them.
Step 7: Feed Your Plants
Vegetables are hungry plants. Even good soil gets depleted over a growing season.
Start with the compost you mixed in at planting. Then side-dress heavy feeders (tomatoes, peppers, squash, corn) with a balanced organic fertilizer or more compost about a month after planting and again mid-season. Leafy greens generally need less. Always follow package rates — more fertilizer is not better and can burn plants or produce lush leaves with no fruit. Your soil test results will tell you if you need anything specific, like extra nitrogen or potassium.
Step 8: Manage Weeds, Pests, and Diseases
Weeds compete with your vegetables for water, light, and nutrients. The mulch you laid down handles most of them; pull the rest by hand while they are small, ideally after rain when the soil is loose. Ten minutes of weeding twice a week beats a weekend-long battle against waist-high weeds.
Pests are inevitable, but most damage is cosmetic. Start with the least toxic approach:
- Handpick large pests like tomato hornworms and drop them in soapy water.
- Blast aphids off plants with a strong jet of water.
- Use row covers (lightweight fabric) over young plants to physically block insects.
- Encourage beneficial insects — ladybugs, lacewings, and parasitic wasps eat pests. Plant flowers like marigolds, alyssum, and dill nearby to attract them.
Only reach for pesticides as a last resort, and when you do, choose the least toxic option labeled for vegetables, apply it in the evening when pollinators are inactive, and always follow label directions exactly. The EPA’s pesticide information page explains how to use these products safely. Note that burrowing pests like rats and squirrels can destroy a garden from below — see our guides on how to get rid of rats and how to get rid of squirrels if you notice tunneling or chewed produce.
For diseases, prevention beats cure: give plants space for airflow, water at the base, rotate crops (do not plant tomatoes in the same spot two years running), and remove diseased leaves promptly. Choose disease-resistant varieties when buying seeds or transplants — look for codes like VFN on tomato labels.
Step 9: Harvest at the Right Time
Harvesting correctly keeps plants producing. Pick beans, cucumbers, zucchini, and peppers frequently — the more you pick, the more the plant makes. Leaving overripe fruit on the plant signals it to stop producing. Harvest leafy greens in the morning when they are crisp, and pick tomatoes when fully colored but still firm. Taste as you go; homegrown vegetables are ready when they taste good, not when they look like supermarket versions.
Common Beginner Mistakes to Avoid
- Starting too big. A small garden you can maintain beats a large one that becomes a weed patch by July.
- Planting too early. Cold soil stunts warm-season crops; waiting two weeks often produces stronger plants than rushing.
- Skipping the mulch. Bare soil dries out, erodes, and sprouts weeds.
- Ignoring spacing. Crowded plants underperform and get sick.
- Inconsistent watering. Alternating drought and flood stresses plants and causes problems like blossom end rot in tomatoes.
- Giving up after one pest attack. Every gardener loses some crops. Learn, adjust, and plant again.
Frequently Asked Questions
How much does it cost to start a vegetable garden?
A basic 4×8-foot raised bed setup typically costs $100-250 including lumber, soil, compost, seeds, and a few transplants. In-ground gardens are cheaper ($30-75 for seeds, compost, and basic tools). Most gardeners recoup the cost in the first season through grocery savings, especially with high-value crops like tomatoes, peppers, and herbs.
When should I start a vegetable garden?
Start planning in late winter and build beds as soon as the soil can be worked in spring. Sow cool-season crops 2-4 weeks before your last frost date and warm-season crops after the last frost when soil is above 60°F. In warm climates (zones 8-10), fall gardens planted in late summer are often more productive than spring ones.
What is the easiest vegetable to grow for beginners?
Radishes are the easiest — they germinate in days and are ready to eat in under a month. Lettuce, green beans, and zucchini are close behind. Cherry tomatoes grown from nursery transplants are the easiest fruiting crop and very forgiving of beginner mistakes.
How many hours of sun does a vegetable garden need?
Most vegetables need at least 6 hours of direct sun daily; fruiting crops like tomatoes and peppers do best with 8 or more. Leafy greens and herbs can manage with 4-6 hours. Less than 4 hours of direct sun is generally not enough for productive vegetable growing.
Do I need to test my soil before planting?
It is strongly recommended, especially for in-ground gardens. A basic soil test ($15-25 through your cooperative extension) tells you the pH and nutrient levels so you amend correctly instead of guessing. If you are filling a raised bed with fresh bagged soil mix, you can skip it the first year.
How do I keep pests out of my vegetable garden?
Use a layered approach: row covers to block insects, handpicking for large pests, water blasts for aphids, and beneficial insect habitat. Fence the garden if rabbits or deer are a problem, and bury hardware cloth 6-12 inches deep around beds to stop burrowers. Only use pesticides as a last resort and choose products labeled safe for edible crops.



One Comment