Creak. Pop. Groan. Old hardwood floors develop a soundtrack, and while a little character is charming, floors that announce every footstep — especially at 2 a.m. — are not. The good news: most squeaks are fixable without tearing anything up. The squeak is almost always wood rubbing against wood (subfloor against joist) or against a nail that’s worked loose. Here’s how to fix squeaky hardwood floors in an old house, from the 5-minute fixes to the from-below solutions.
First: Diagnose the Squeak
Walk the floor slowly and mark every squeak with painter’s tape. Then determine what’s moving:
- Have someone walk while you listen from below (basement/crawlspace). If you can see the subfloor flexing against a joist, that’s your culprit.
- Check for loose nails — look for nail heads that have popped slightly or boards that move when stepped on.
- Note the pattern: squeaks near walls often mean the boards have pulled from the joist; squeaks mid-span often mean subfloor-joist gaps.
- Consider the season. Winter squeaks that vanish in summer are humidity-related — wood shrinks in dry heated air, creating gaps. A humidifier (30–50% relative humidity) can quiet seasonal squeaks without any repair.
Fixes From Above (No Basement Access Needed)
The talcum powder / graphite trick
For minor squeaks between boards: work powdered graphite or talcum powder into the seams, then walk on it to work it in. It lubricates the wood-on-wood contact. It’s a temporary fix (months, not years) but takes five minutes and sometimes that’s all you need.
Squeak-relief screws (the real fix)
Specialty breakaway screws (like Squeeeeek No More kits, ~$25) are designed exactly for this: you drive the scored screw through the hardwood into the joist/subfloor with a special jig that controls depth, then snap off the head below the surface. The tiny hole gets filled with wood filler. Locate the joist with a stud finder, drive screws every 6–8 inches along the squeaky board into the joist, and the squeak is gone — permanently. This is the fix flooring pros use, and it’s very DIY-friendly.
Re-seat loose nails
If you find popped finish nails, don’t just hammer them back — they’ll pop again. Pull them and replace with slightly longer ring-shank flooring nails, or add a screw nearby. Set nail heads slightly below the surface with a nail set and fill.
Fixes From Below (Basement or Crawlspace Access)
If you can reach the underside, you have the best options — all invisible from above:
- Shim the gap: Where subfloor meets joist with a small gap, tap in a wood shim coated with construction adhesive. Don’t force it — over-shimming lifts the floor and creates new squeaks. Snug is enough.
- Sister a 2×4 alongside the joist: Apply construction adhesive to a 2×4 and screw it tight against the joist and up under the subfloor. This is the heavy-duty fix for springy, bouncy sections.
- Screw up from below: Short wood screws driven up through the subfloor into the hardwood (careful with length — measure twice, screw once) pull the layers together silently.
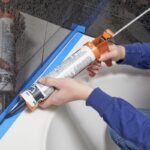
- Adhesive injection: Construction adhesive squeezed into the joist-subfloor gap, then weighted from above while it cures.
This Old House’s squeaky floor guide has excellent diagrams of the from-below techniques.
What NOT to Do
- Don’t just keep hammering nails. Each new nail is a future squeak. Screws hold; nails work loose — that’s the whole problem.
- Don’t use long screws from above without knowing joist location. Missing the joist just puts holes in your floor for nothing.
- Don’t ignore the humidity angle. If squeaks are seasonal, fix the humidity before drilling holes.
- Don’t use WD-40 or oils on wood floors. They stain, go rancid, and don’t address the mechanical cause.
When Squeaks Signal Bigger Problems
Most squeaks are benign. But call a professional if you notice: floors that feel spongy or bouncy across large areas (possible joist damage or rot), visible sagging, water staining, or squeaks accompanied by a musty smell (possible subfloor rot). Old houses sometimes hide real structural issues under charming creaks — an inspection ($200–$400) is cheap peace of mind.
Preventing Future Squeaks
- Maintain 30–50% indoor humidity year-round
- Address water issues immediately — moisture swells wood, then shrinkage creates gaps
- When refinishing floors, have the contractor screw down loose boards first
- Keep plumbing leaks from reaching wood floors — water is hardwood’s mortal enemy
Living With Old Floors Gracefully
Sometimes the right answer isn’t fixing every squeak — it’s accepting the character. Old hardwood floors with a few quiet creaks are normal; a house that’s silent underfoot is a new house. The goal is eliminating the annoying squeaks (the bedroom hallway at midnight, the spot under the baby’s room) while letting the rest be.
Prioritize by impact: fix squeaks in bedrooms and hallways used at night first — those affect sleep and daily sanity. Living room squeaks during the day bother almost nobody. And consider rugs strategically: a well-placed runner over the worst hallway squeak both muffles it and reduces the flexing that causes it. It’s not a repair, but it’s a legitimate management strategy.
Long-term, the best thing you can do for old floors is stable humidity (30–50% year-round), prompt attention to water (the enemy of all wood floors), and refinishing on a sane schedule (every 15–25 years for most homes, not every 5). Floors that are maintained this way don’t just stop squeaking — they outlast everything else in the house.
Refinishing: The Right Time to Address Everything
If your floors are due for refinishing anyway (every 15–25 years), it’s the perfect moment to fix squeaks comprehensively. With the finish sanded off, a flooring pro can screw down every loose board, shim subfloor gaps, and address the issues that spot-fixes can’t reach — then refinish over the repairs invisibly. Bundle the work: squeak repair during refinishing costs a fraction of doing it separately, since the floor is already prepped and the crew is already there.
Tell the refinisher about squeaks upfront — it’s a standard add-on, not a surprise. And it’s the only time you’ll ever have this access without tearing up finished flooring. If the floors are worn enough to need refinishing and squeaky, combining the projects is the smart money.
The Bottom Line
To fix squeaky hardwood floors in an old house: try humidity control and powder for minor cases, use breakaway squeak-relief screws from above for the permanent DIY fix, or shim and screw from below if you have access. Most squeaks surrender to one of these in an afternoon. And if your floors are beyond squeaking into genuinely worn-out, our comparison of pet-friendly flooring and laminate vs. vinyl will help you decide what comes next.